For some reason I never finished this post back in 2016. I saw this rough draft when I was writing my blog just the other day, so I decided to finish it, a year and a half later.
Back in the winter of 2016, I was working on a tango dress, draping it and sewing it. This was to be a model dress for our group performance. As it turned out we never did use this (we were fortunate to have Celina Rotundo to design and sew all of our dresses. She did about 10 dresses in just about 2 wks! She is a beautiful designer, seamstress and dancer), but it was a great learning experience for me. I have draped and designed costumes before, so it’s not something out of the ordinary for me, but it was different because it wasn’t for me or my daughter this time and the plan was to do this dress for about 10 ladies in our group. I normally only sew for personal use.
It sometimes takes me awhile to figure everything out. I look at the dress form, think, draw, think, start draping fabric, think, think, think. The thinking process takes me the longest. I’ll put it together, stand back, figure it out and walk away from it and think. Then when I go back to it, I sometimes do something or other times, think about what to do. Once the pattern is finished and I lay it out on the fabric, there’s more thinking. I don’t want to cut without being sure. This process sometimes takes me a few days, but once I get it, then I have it. I can’t remember exactly, but this process took me about a month of working on it and thinking about it.
This was my stash of fabric that we could use. We selected the red spandex with a black spandex lining. The black spandex was a little thick for a lining but in the end, it worked. In retrospect, I would have liked a more intense black for the lining, but this was actually just a test dress for the performance group, so I went with what I had. Next I had to figure out the design and drape it on my dress form. Because it’s spandex (stretch) fabric, I had to use a stretch fabric for draping and I was using a 4-way stretch fabric. Spandex is pretty expensive but I did have an inexpensive white spandex that I could use for draping. Draping is the process of designing a pattern on a dress form. It’s pinned, cut and formed and then from that, the pattern is made.
So, first, I wrapped the fabric around the dress form, From there I started pinning, cutting and tucking .


Next, I removed the fabric from the dress form in pieces and layed it out on the real fabric to cut it. My next step was to sew portions of it and then pin it together on the dress form again to make sure that it fit and then to tweak what needed tweaking.


")


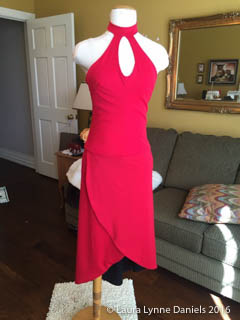
I was having some trouble with the front, which was overlapped and it wasn’t laying nicely, but with work and a lot of thinking, I got it to sit smooth.


I liked it (I am actually thinking about making something like this for myself one day, I still have the pattern), but my teacher wanted something a bit different, a straighter skirt and maybe a halter top. So back to the draping/cutting board. I disassembled the dress and made up a new top, and recut the skirt of the dress so that it was longer and straighter. I was having some problems because while attaching the skirt to the bodice, there was a lot of bulk around the whole upper hipline, and especially where the skirt fabric overlapped in front. It made a very unattractive line and nobody wants any extra bulk in that area.


Next was to trim the excess fabric off of the interior seam of the waist (the two spandex fabrics together, the lining and outer fabric, were too heavy for a seam especially where the front overlapped) with graduated cutting of the seams and fix the overlap by sewing it in place on the top portion of it, and then serging the hip line seam to reduce the bulk. After that then the hip line seam had to be sewn down flat, so that it would sit smooth on the hips.


This was the final dress and I was happy with it.


")
If I had done this for all of the ladies, I would have had to make multiple patterns for the different sizes, but once the main pattern is finished, it’s not as big of a job as the actual designing. I was extremely happy that Celina was here in the U.S. (she’s from Argentina) to do it. We used a completely different fabric and each lady had a different design with the same fabrics. This was her creation and the dresses were perfect! I never would have been able to do all of that in such a short period of time and I would not have had the insight and knowledge to make each dress different.

")


I did sew some costumes for that performance. All of the ladies that did the performance the previous year had a costume, so I had to make one for myself and one of the other ladies to match the others.


And then I and one of the other ladies in the group, put together these skirts for the ladies performance group.


That was my 2016 tango performance and costume designing year!
I also did a flamenco performance that same year and designed those costumes. This is the design, I did not sew them, I only designed them. We had them sewn by Alicia Harris, a flamenco costume designer in Spain.


Thank you for reading my blog!
Laura
SaveSave

Leave a comment